Drupal 6 to 7 migration not just a simple upgrade, it involves several steps and the process may vary for each site. This may increase in complexity for more complex websites. This tutorial will instruct you the steps that are to be followed one after another in order to upgrade a Drupal 6 website to Drupal 7.
Step by step guide to migrate simple Drupal 6 website to Drupal 7
Before upgrading your website to Drupal 7, make sure that all contributed modules used in your website are available for Drupal 7. You have to rewrite any custom modules from your Drupal 6 site.
Step 1: Backup your website
This is the first and most important step of the upgrade process. In this, you got to backup your database first.
- Open phpmyadmin of your server,

- Select the database of your website from the left sidebar.
- Look for an option 'export' at the top and click it.

- Now select 'quick' and click go
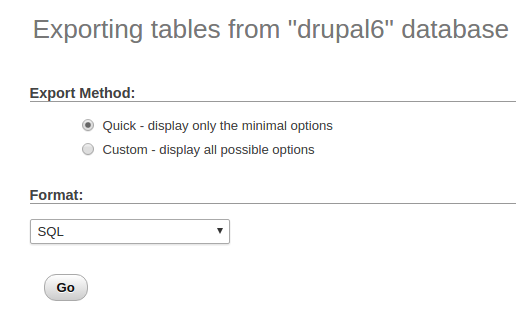
- After that, your database should start downloading.
- Then, backup all your folders and files. You can do this either by compressing and downloading all the folders of your website or use the backup feature (if available) of your hosting control panel.
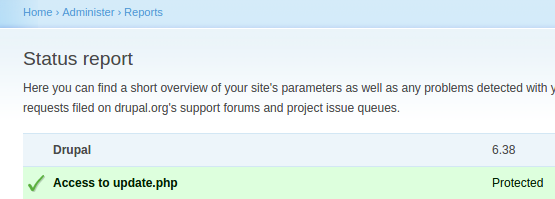
Step 2: Verify the version of your Drupal 6 website
- Updates get released for Drupal 6 every now and then. So, it is important to upgrade to the latest version in Drupal 6 before upgrading to Drupal 7.
- You can check the current version of your Drupal 6 site by navigating to the ‘status report’ (Administer > Reports > Status Report)
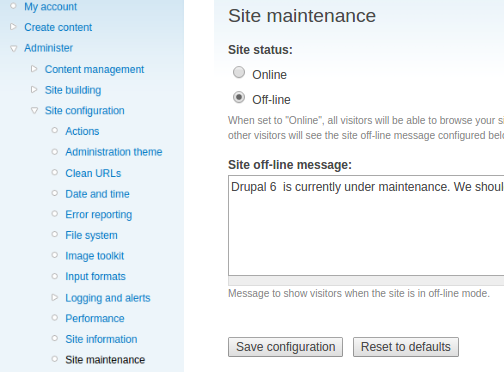
Step 3: Put the site in maintenance mode
- It is better to ensure that nobody uses the site while it's being upgraded. The site just shows a 'site under maintenance' page to the other users while administrator can continue to work on the website.
- Navigate to Administer > Site configuration > Site maintenance and select the option 'Off-line' and save the configuration.
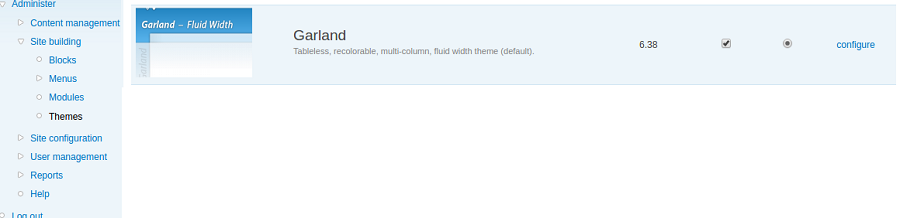
Step 4: Change the theme to garland
- Go to Administer > Site Building > Themes and set garland as the site’s default theme.
- We can change the theme back to the current theme after migration if every component of the garland theme works perfectly.
- The administration theme can either be garland or seven according to your ease of use.
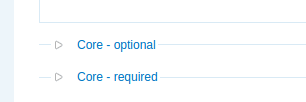
Step 5: Disable all modules except the core ones
- Navigate to Administer > Site Building > Modules and uncheck all the modules but the ones under the sections 'core-optional' and 'core-required'.
- Some modules cannot be disabled in a single step. They will become available for disabling after you save the configuration. Repeat this until all non-core modules are disabled.
Step 6: Uninstall useless modules
- Uninstall the modules that you think you will not need anymore in Drupal 7.
- Go to the ‘uninstall’ tab on the top of the page and check the modules and their data which you do not want to migrate.
- Scroll to the end of the page and click the uninstall button.

Step 7: Remove all folders except sites
- First, remove the settings.php file from your /sites/default folder.
- Then, from your hosting control panel, select all the folders except the sites folder and delete
- Remove all the module folders inside the /sites/all/modules folder.
Step 8 : Download and extract Drupal 7
- Download the latest version of Drupal 7 from https://www.drupal.org/project/drupal
- Extract the archive in your server.
- Copy all the folders into your website’s folder (only if you had extracted it in some other folder)
- Replace any files that are in the sites folder (if it prompts you to do so).
Step 9: Rewrite previous changes (if any) to .htaccess file
- Right click on the .htaccess or robots.txt file and select edit from your hosting control panel.
- Rewrite the .htaccess or robots.txt files if you had any custom changes in Drupal 6.
Step 10: Change permissions for the settings.php file
- The settings.php file will be write protected by default. The installer will need to write it while the installation process starts.
- It is necessary to make sure that the settings.php file has enough permissions for the installer to modify it.
- Change the permission of the settings.php file into 644 or 666.
Step 11: Run update.php
- Now, run the update.php. You can do this by typing the url in your browser as http://yourdrupalsite.com/update.php
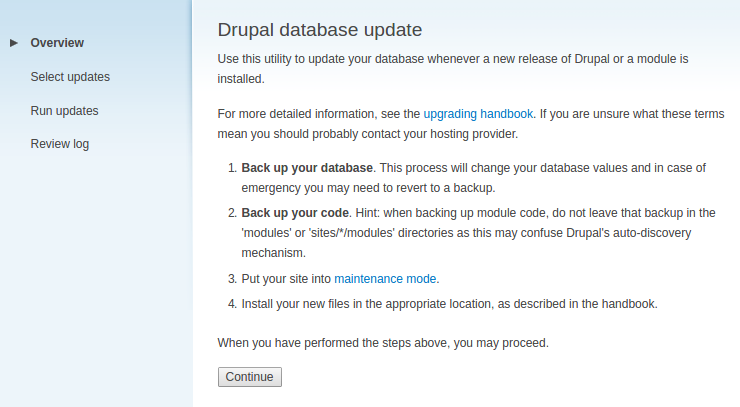
- Ensure that the ‘$update_free_access’ is set to TRUE in the settings.php file.
- Read the instructions before clicking the 'continue' button.
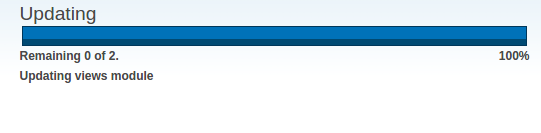
- If everything is good, click the continue button and you’ll see the progress bar of the update process.
- Backup the new database if the update process was successful and returned no errors.
- If it returns an error, try to find the source of the error, fix it and then re-run update.php
Step 12: Update your modules
- Download the modules one by one and extract them into your sites/all/modules folder and run update.php each time.
- Check your notes, and the UPGRADE.txt files inside each module, to see if any special upgrade instructions apply.
- Fully remove the old module directory inside sites/all/modules/ (if you haven’t done already)
- Enable the module.
- Run update.php again (you should have run it once already when upgrading core) and check for any message output.
- Backup your database and files again, between each module update, so that if there is a problem, you can revert to the most recent update.
If there was an error,
- Note down the error message and revert back to previous state by importing the most recent database that we backed up.
- Update other modules and finally update the modules that gave out error messages. This should help solve the problem to some extent.
- Check each modules’ .info file (for views module it would be views.info inside /sites/all/modules/views) for any dependency. Download and extract all the dependent modules with views (the module which you are going to update at the moment) to avoid any dependency errors as drupal modules are dependent on one other.
Step 13: Change the theme
- Be sure to make the settings.php file unwritable.
- Change the permissions of settings.php to 444.
- Do not forget to change the '$update_free_access' in the settings.php to FALSE.
Step 15: Put the site back online
- If everything is just fine, go ahead and put your site online by navigating to Administration > Configuration > Development > Maintenance mode.